
Custom Forms Overview
Custom Forms in Flavor CRM helps you build and share online forms for registrations, feedback, enquiries, events, and campaigns. Open Settings, select Custom Forms, then click Open Forms. Add fields in the builder, publish the form, and share by link or QR code. Responses are stored in Flavor. Connect forms to Leads or Student records to map fields and create or update CRM data. View submissions, export lists, and disconnect mapping when needed.
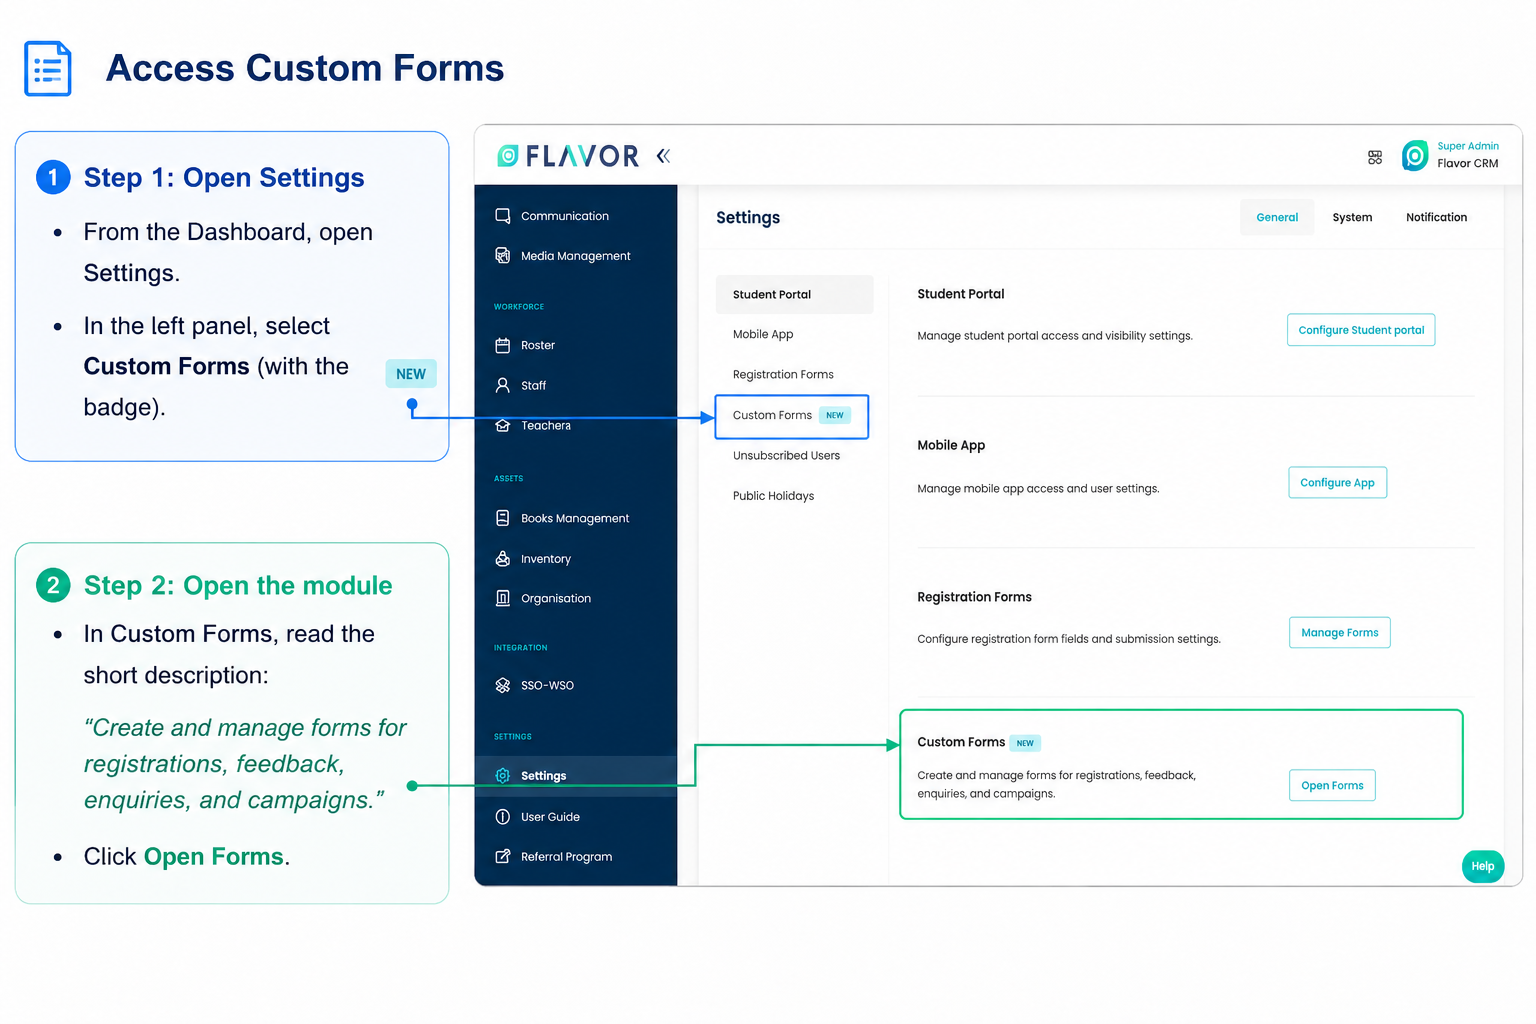
Access Custom Forms
Follow these steps to navigate to the Custom Forms module in Flavor CRM.
Step 1: Open Settings
- From the Dashboard, open Settings
- In the left panel, select Custom Forms (with the NEW badge)
Step 2: Open the Module
- Read the short description: Create and manage forms for registrations, feedback, enquiries, and campaigns.
- Click Open Forms
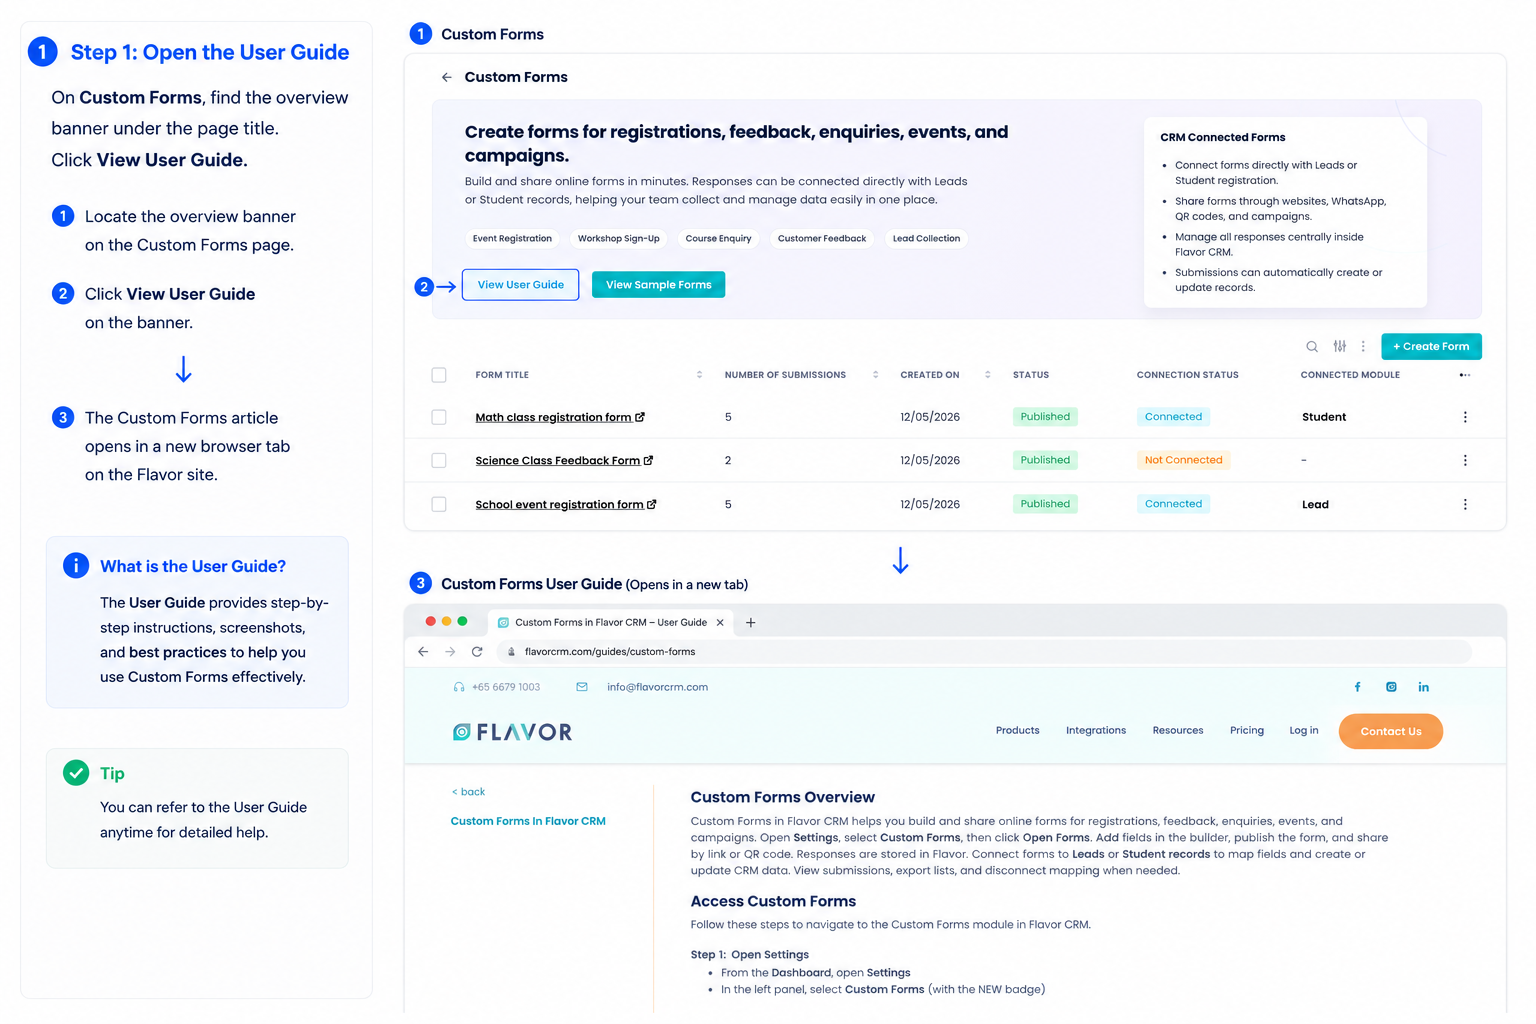
Custom Forms List Overview
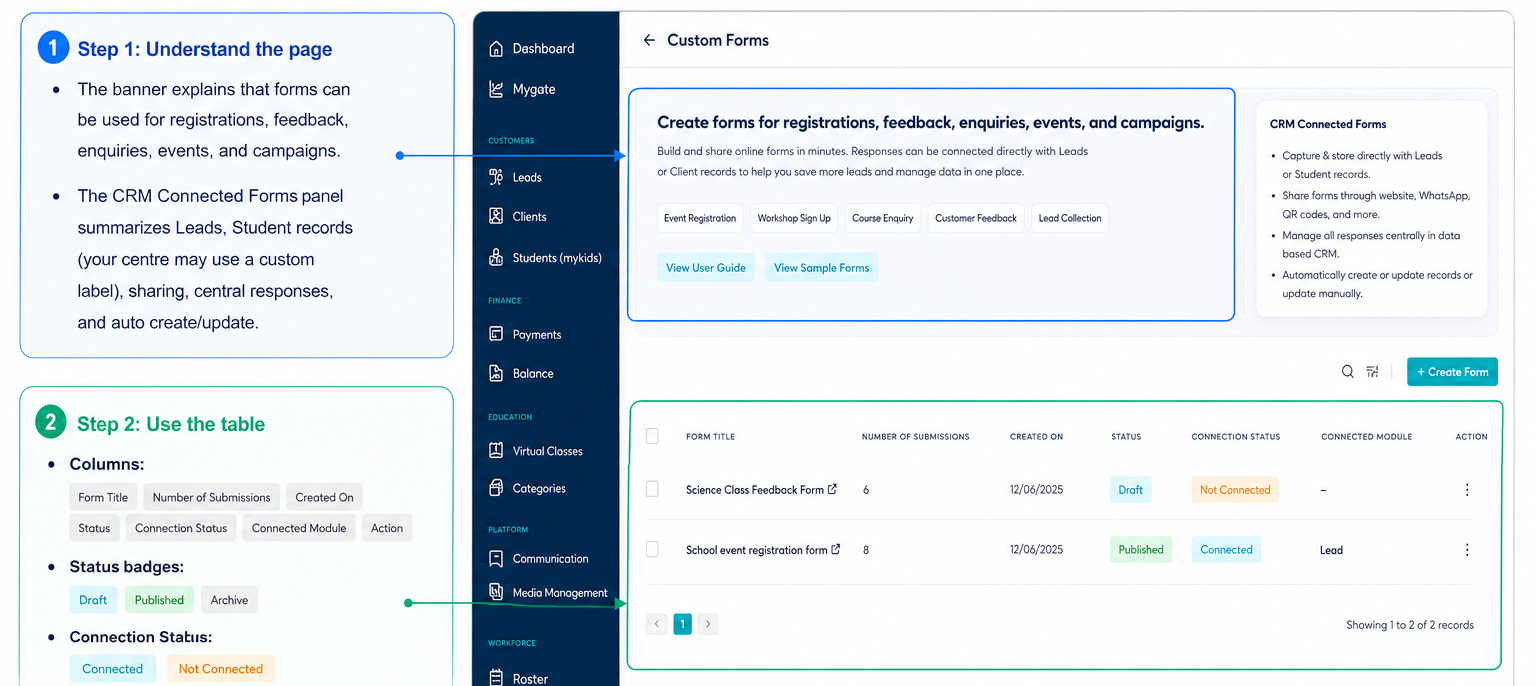
The Custom Forms page opens with an overview banner, View User Guide, View Sample Forms, and the forms table.
Step 1: Understand the Page
- The banner explains that forms can be used for registrations, feedback, enquiries, events, and campaigns
- The CRM Connected Forms panel summarizes Leads, Student records, sharing, central responses, and auto create/update
Step 2: Use the Table
- Columns: Form Title, Number of Submissions, Created On, Status, Connection Status, Connected Module, Action
- Status badges: Draft, Published, Archive
- Connection Status: Connected or Not Connected
- Connected Module: Lead, or Student
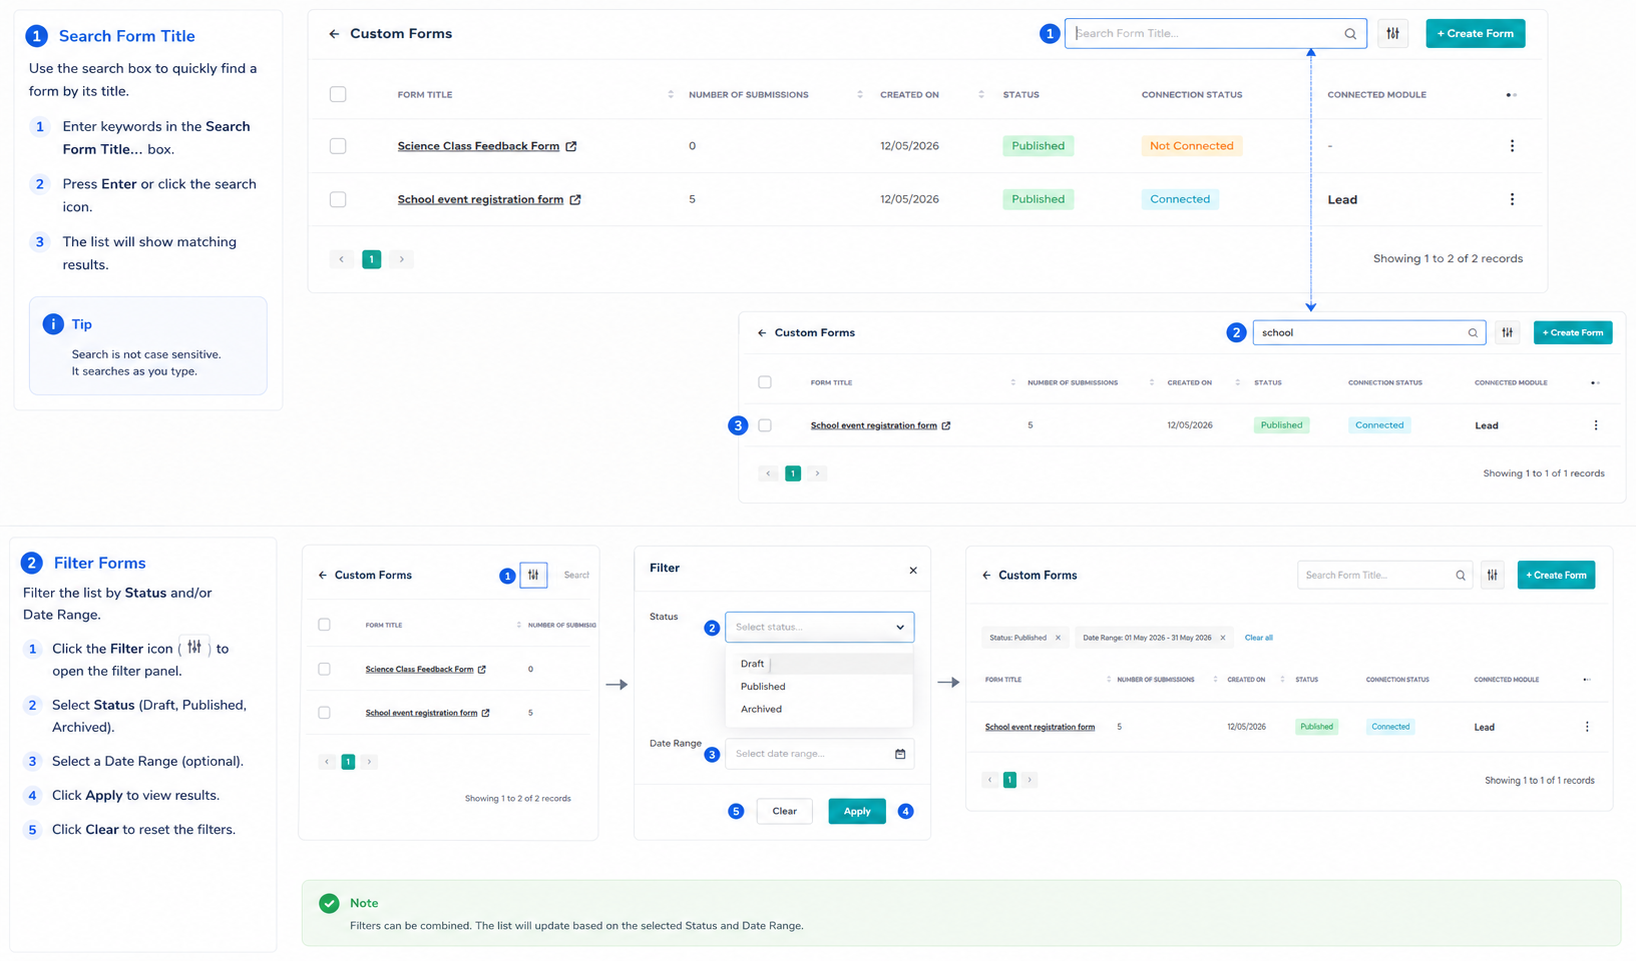
Step 3: Search and Filter
- Search with Search Form Title… (press Enter)
- Open Filter; set Status (Draft, Published, Archived) and/or Date Range; Apply or Clear
Step 4: Row and Bulk Actions
- Click a row to open Submissions for that form
- Use the row Action menu (⋮): Generate Link, Edit Form, Connect Form / Edit Form Connection, Disconnect Form, Delete
- Select rows and use bulk Actions → Delete where your role allows
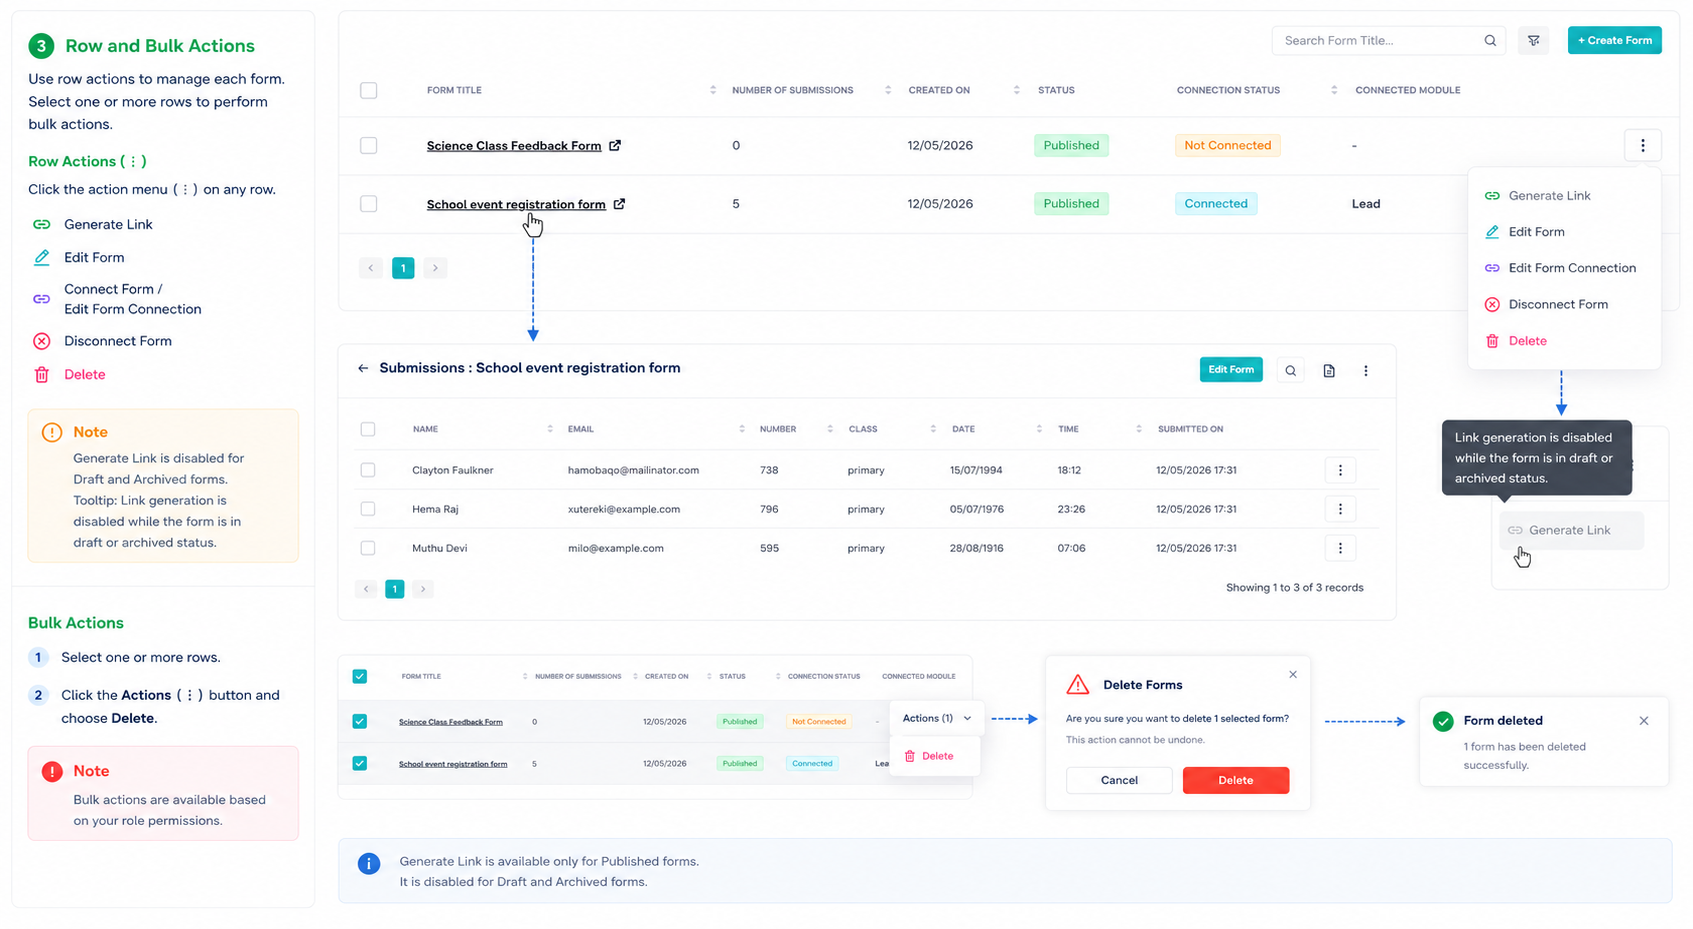
Note: Generate Link is disabled for Draft and Archive forms. Tooltip: Link generation is disabled while the form is in draft or archived status.
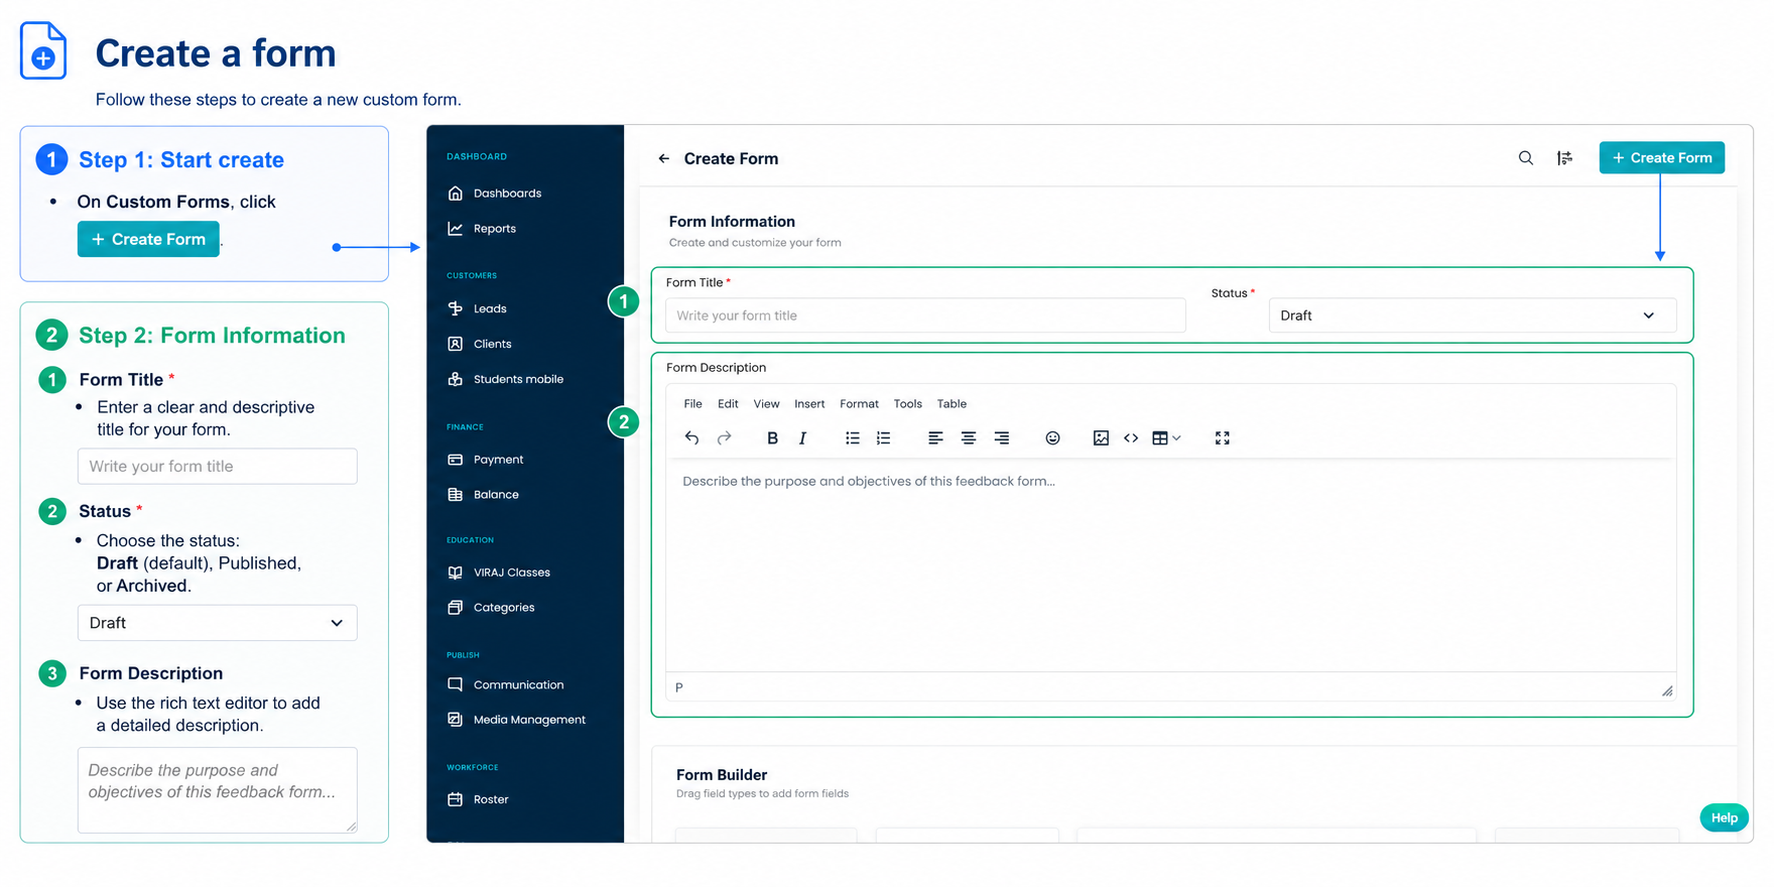
Create a Form
Step 1: Start Create
- On Custom Forms, click + Create Form
Step 2: Form Information
- Form Title * — placeholder: Write your form title
- Status * — Draft (default), Published, or Archived
- Form Description — rich text; placeholder: Describe the purpose and objectives of this feedback form…
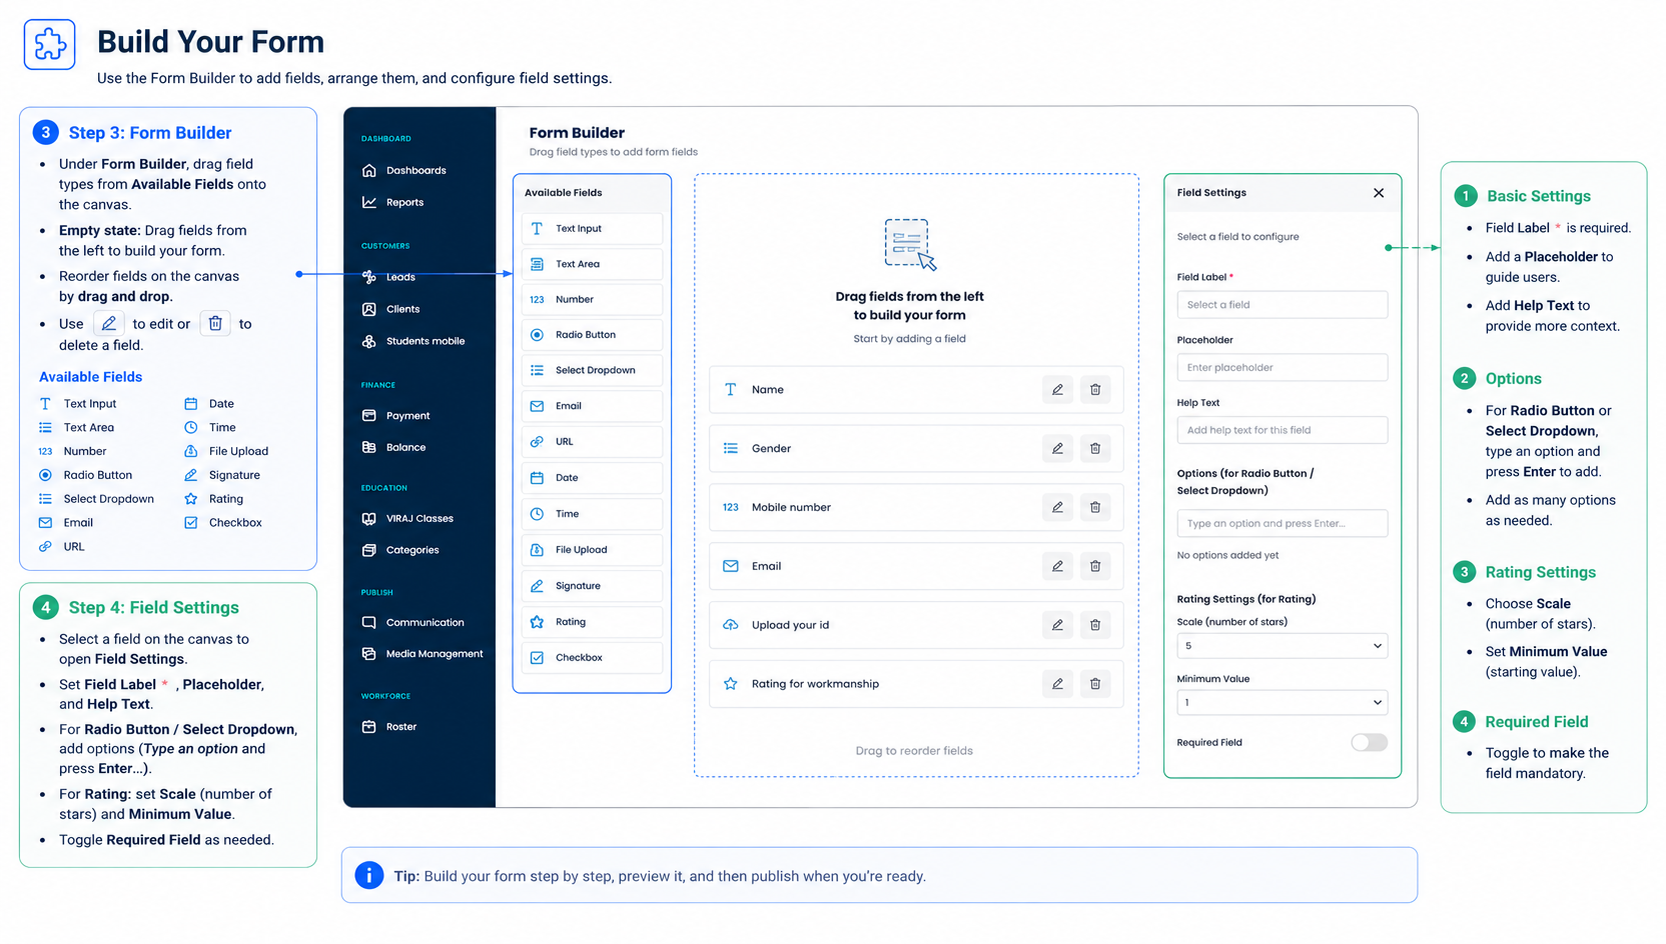
Step 3: Form Builder
- Under Form Builder, drag field types from Available Fields onto the canvas
- Available fields: Text Input, Text Area, Number, Radio Button, Select Dropdown, Email, URL, Date, Time, File Upload, Signature, Rating, Checkbox
- Reorder on the canvas; Edit or Delete per field
Step 4: Field Settings
- Select a field; Field Settings panel opens
- Set Field Label *, Placeholder, Help Text
- For Radio Button / Select Dropdown: add options (type an option and press Enter)
- For Rating: set Scale (number of stars) and Minimum Value
- Toggle Required Field as needed
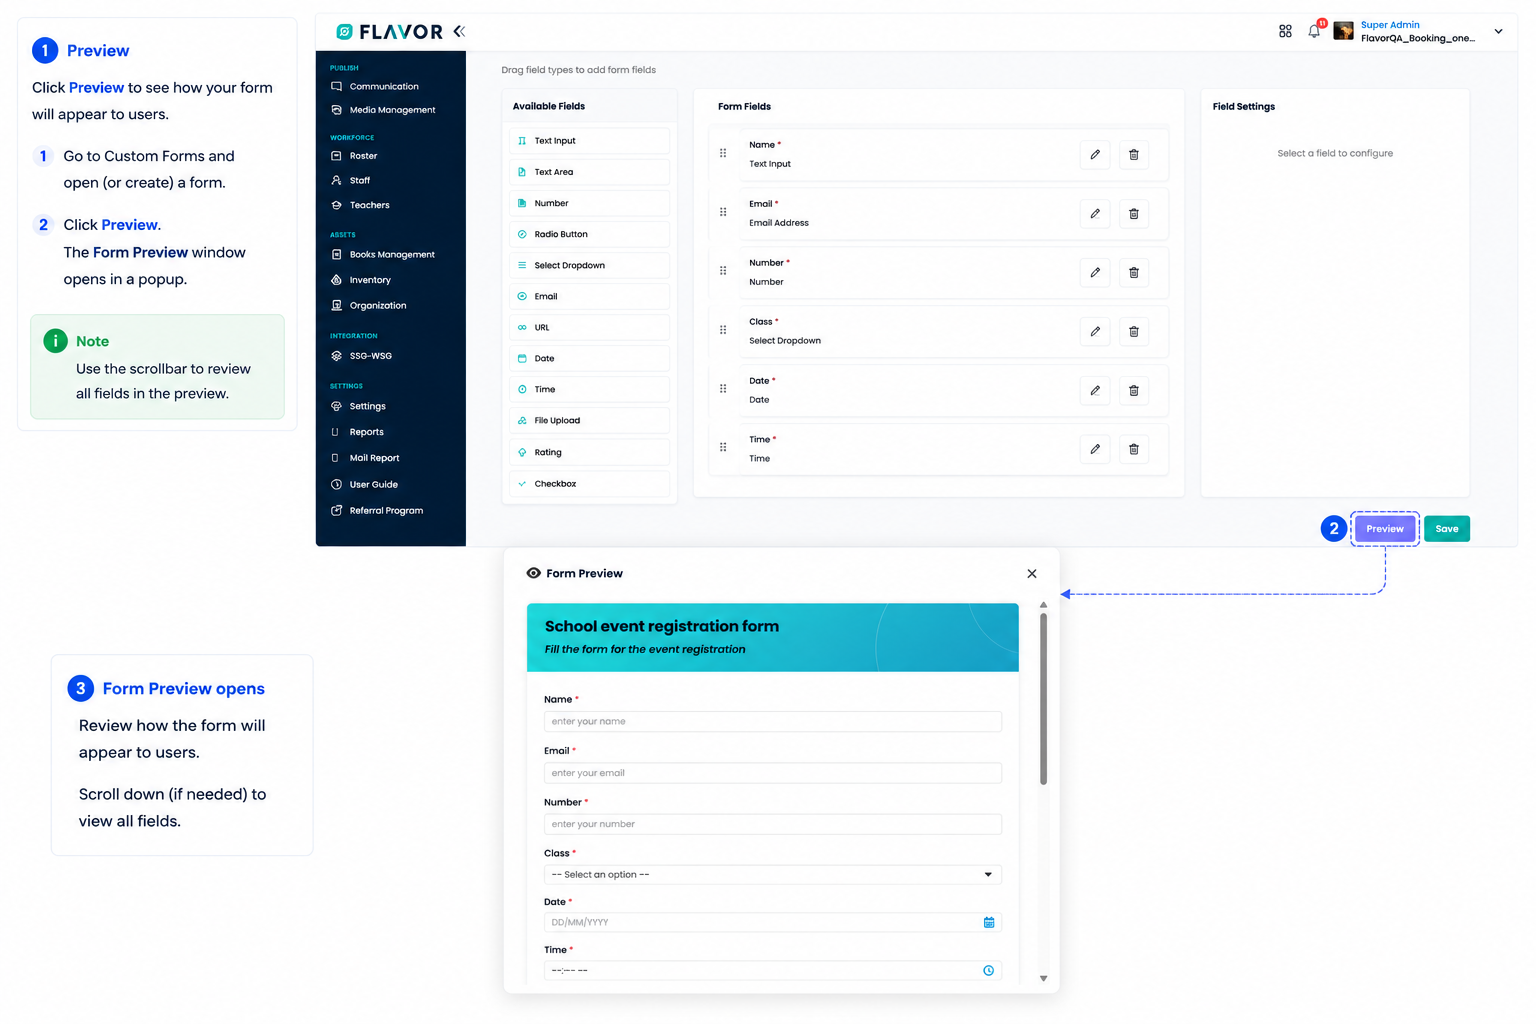
Step 5: Preview and Save
- Click Preview → Form Preview opens
- Click Save → returns to Custom Forms with a success message
Note: At least one field is required; every field needs a label. Duplicate titles are blocked: Form title already exists. Please choose a different title.
Edit a Form
Step 1: Open Edit
- Row Action (⋮) → Edit Form, or from Submissions click Edit Form
Step 2: Update and Save
- Change Form Information and Form Builder as needed
- Preview if needed, then Save
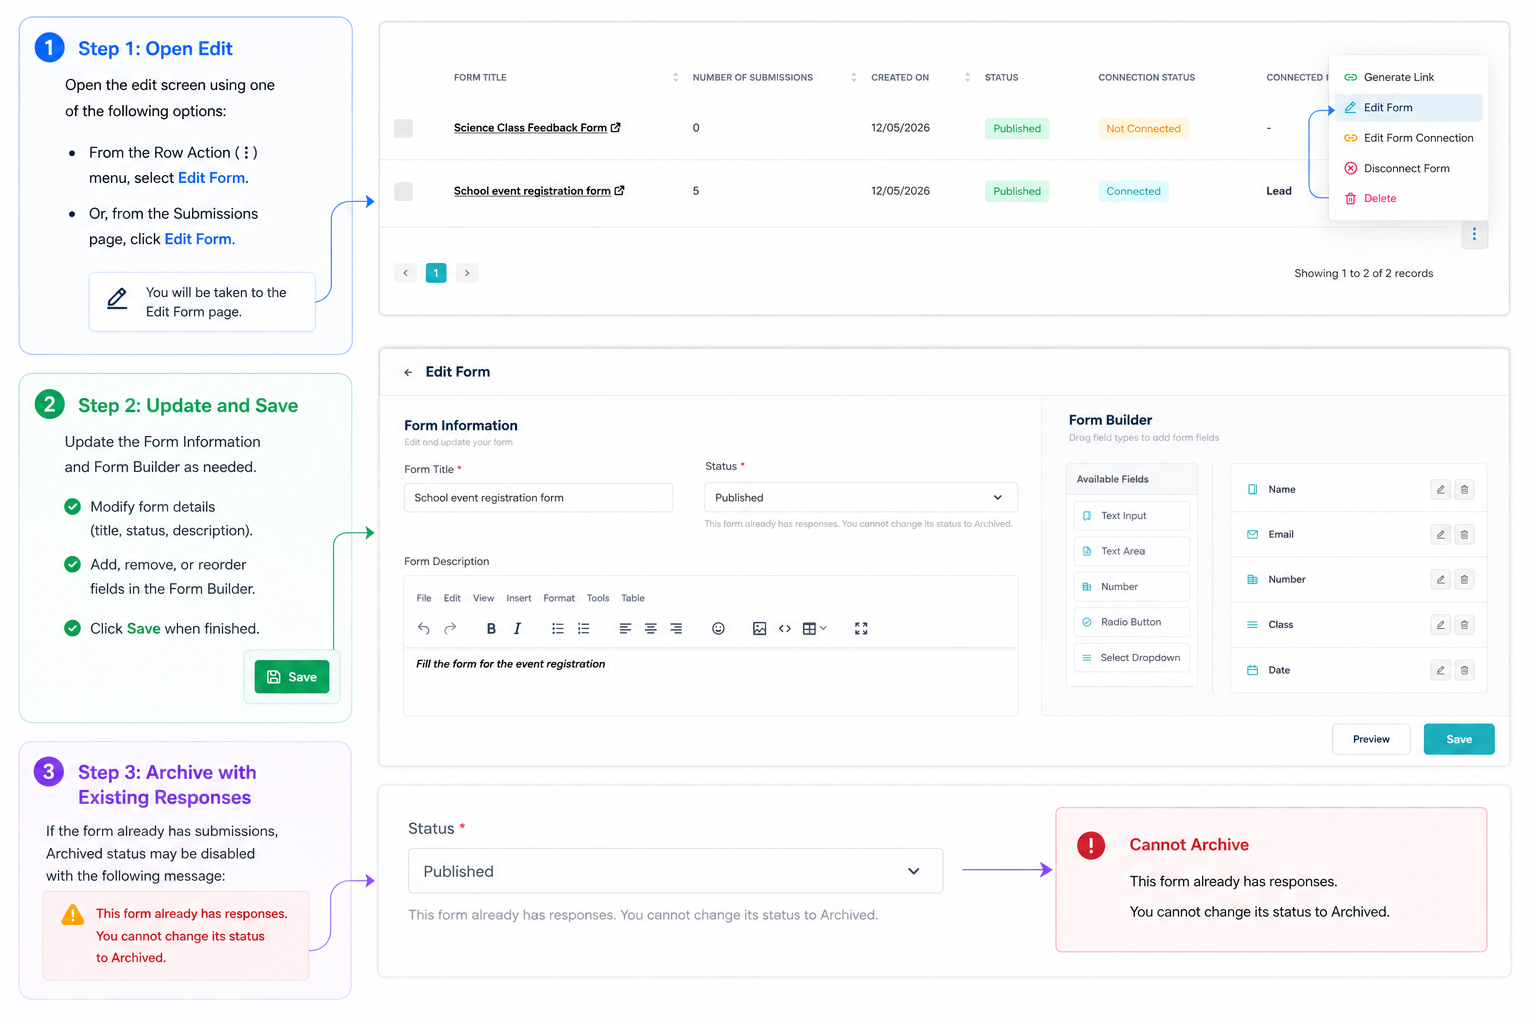
Step 3: Archive with Existing Responses
- If the form already has submissions, Archived status may be disabled with: This form already has responses. You cannot change its status to Archived.
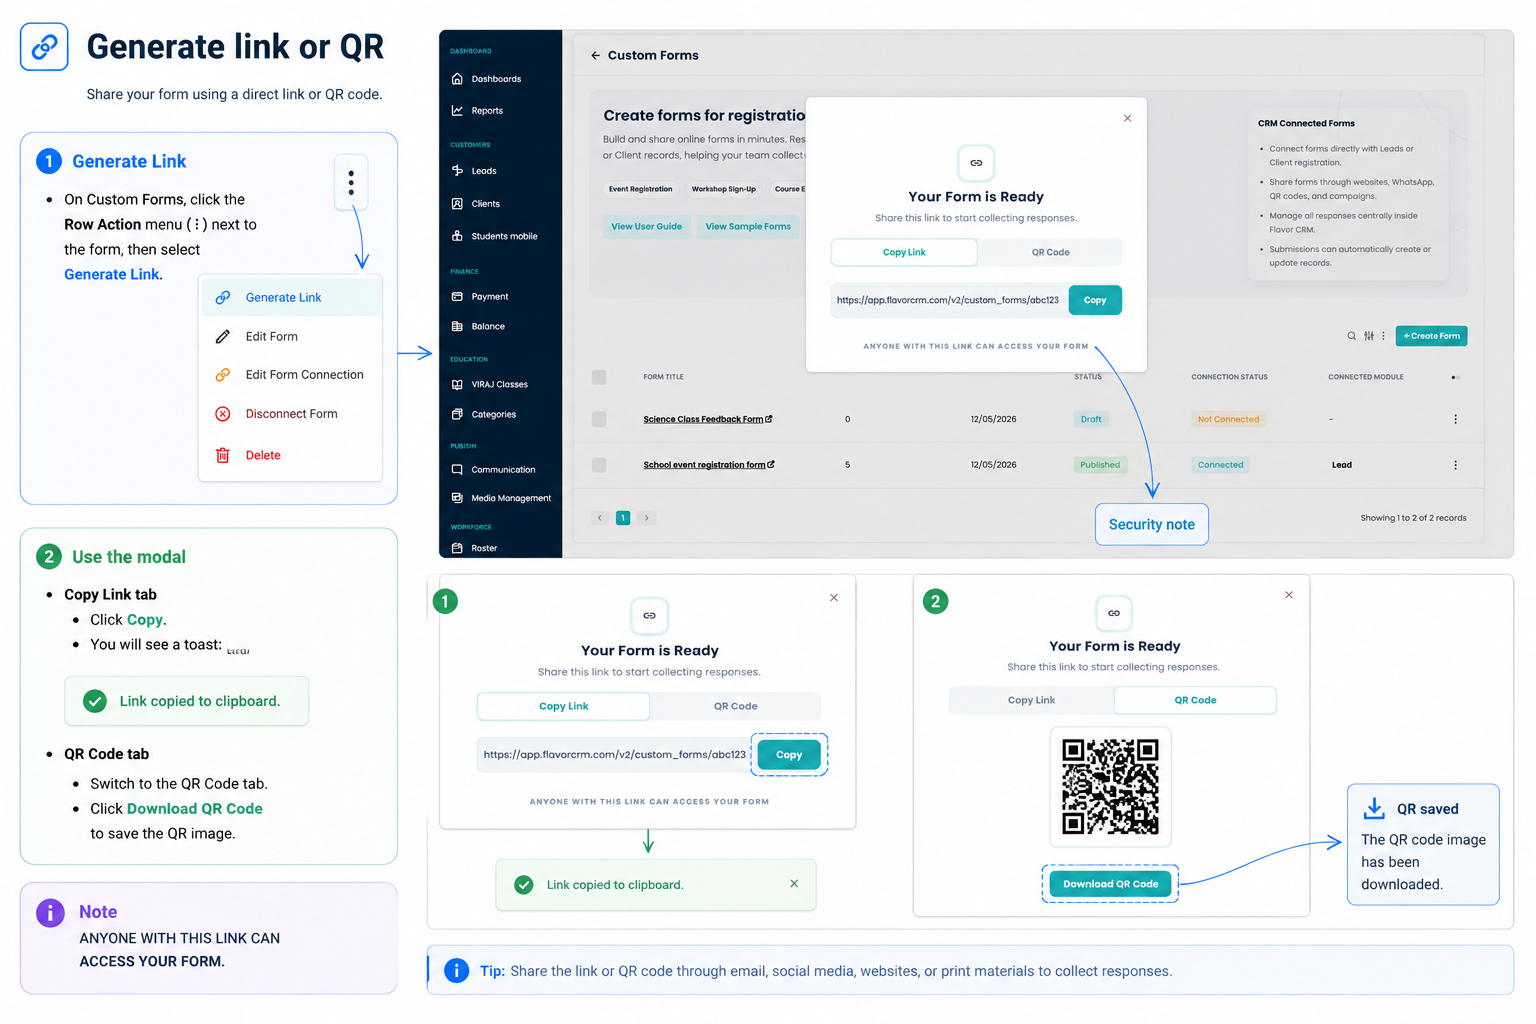
Generate Link and Share a Form
Step 1: Publish
- Set Status to Published on create or edit and save.
Step 2: Generate Link or QR
- On Custom Forms, row Action (⋮) → Generate Link.
- Modal Your Form is Ready appears; note ANYONE WITH THIS LINK CAN ACCESS YOUR FORM.
- Copy Link tab → Copy (toast: Link copied to clipboard).
- QR Code tab → Download QR Code.
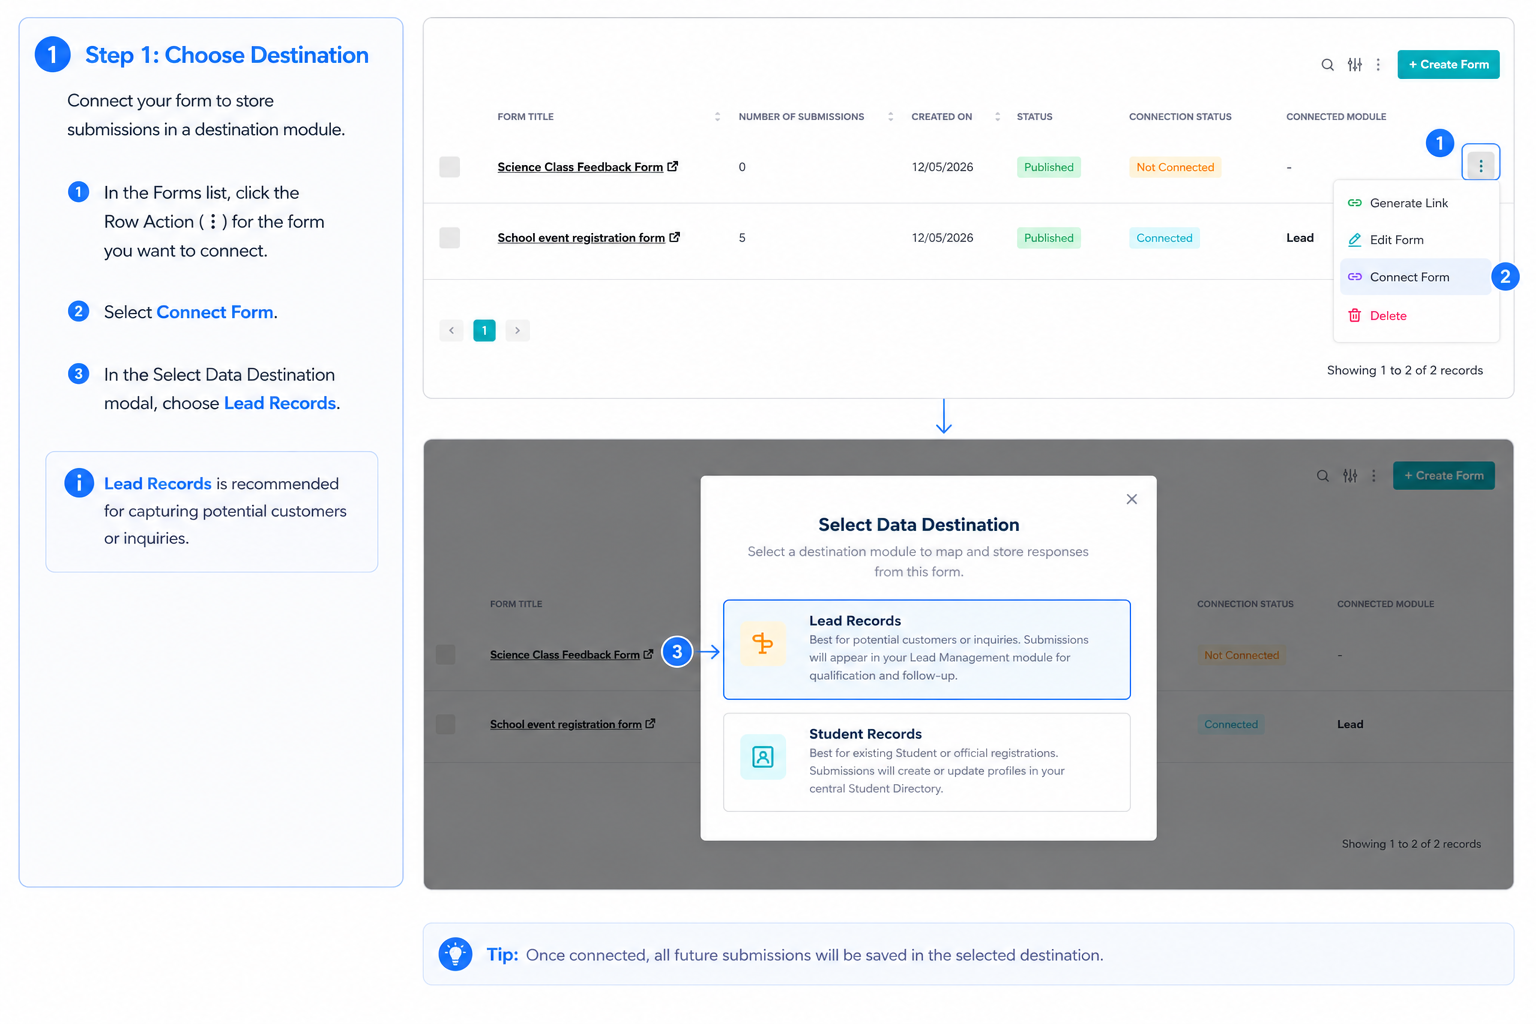
Connect a Form to Leads
Step 1: Choose Destination
- Row Action (⋮) → Connect Form
- Under Select Data Destination, choose Lead Records
Step 2: Form Availability (if shown)
- Configure Subsidiary and Branch multi-selects
- Nothing Selected — OPEN (any branch can submit)
- Subsidiary Selected — PARTIAL (respondent picks a branch)
- Branch Selected — FIXED (branch is pre-set)
Step 3: Field Mapping
- Map each FORM FIELD to a MAP TO LEAD FIELD
- Required CRM fields are marked with *
- Click Save Mapping

Step 4: After Connection
- Use Edit Form Connection or Disconnect Form from the row menu
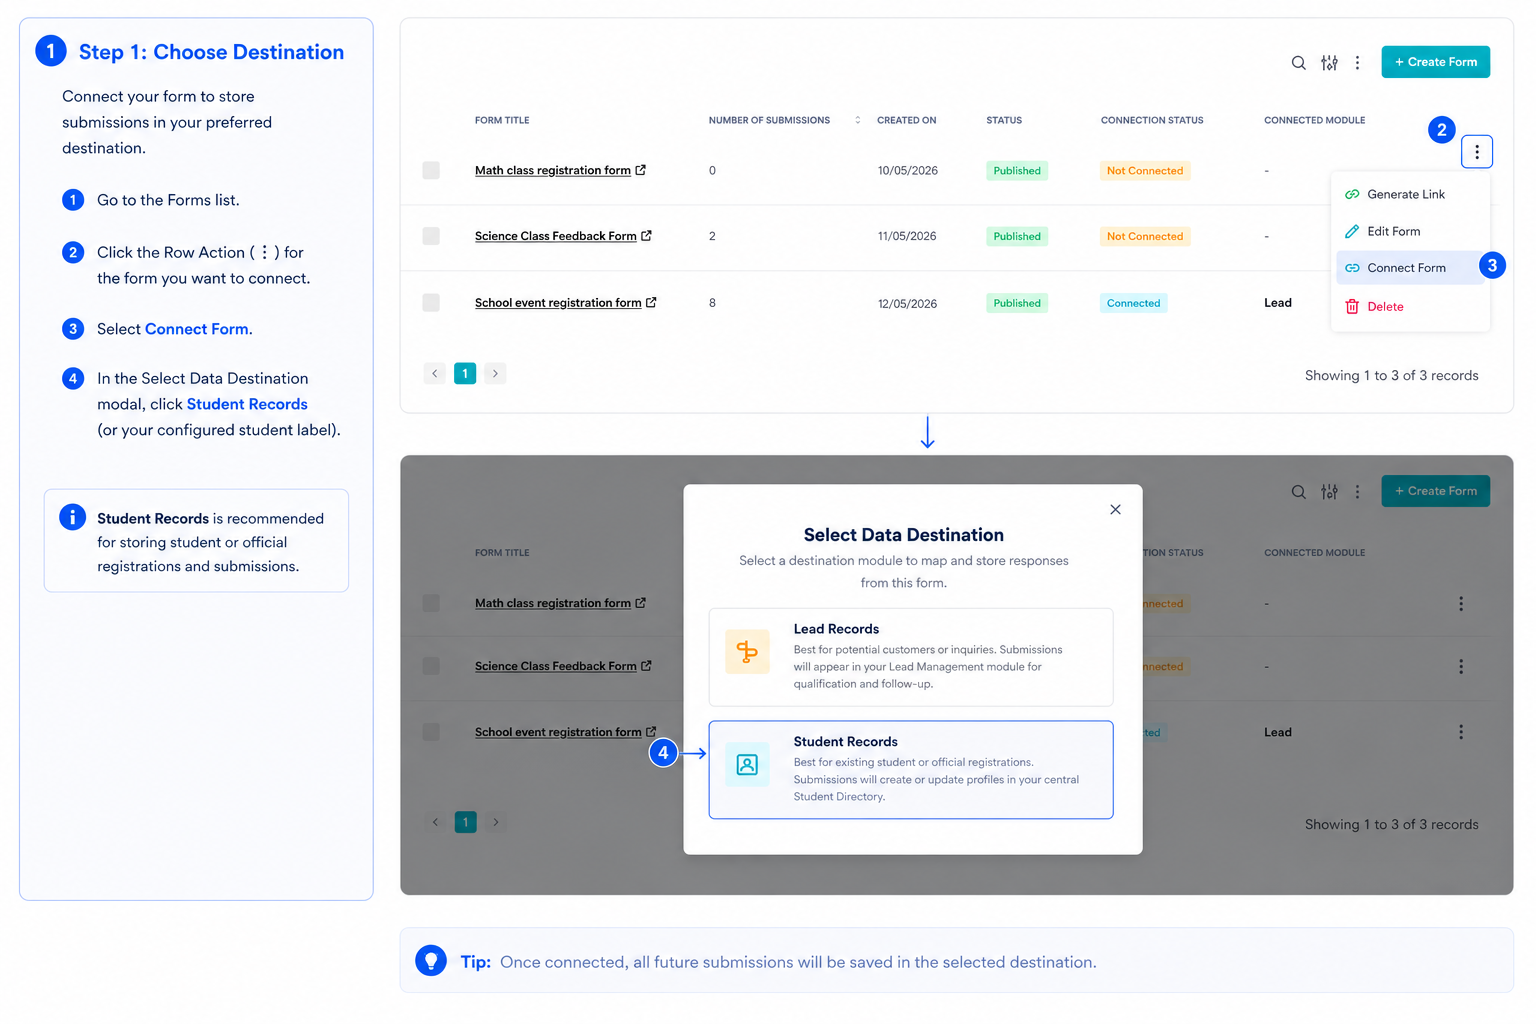
Connect a Form to Student Records
Step 1: Choose Destination
- Connect Form → Select Data Destination → Student Records (or your configured student label)
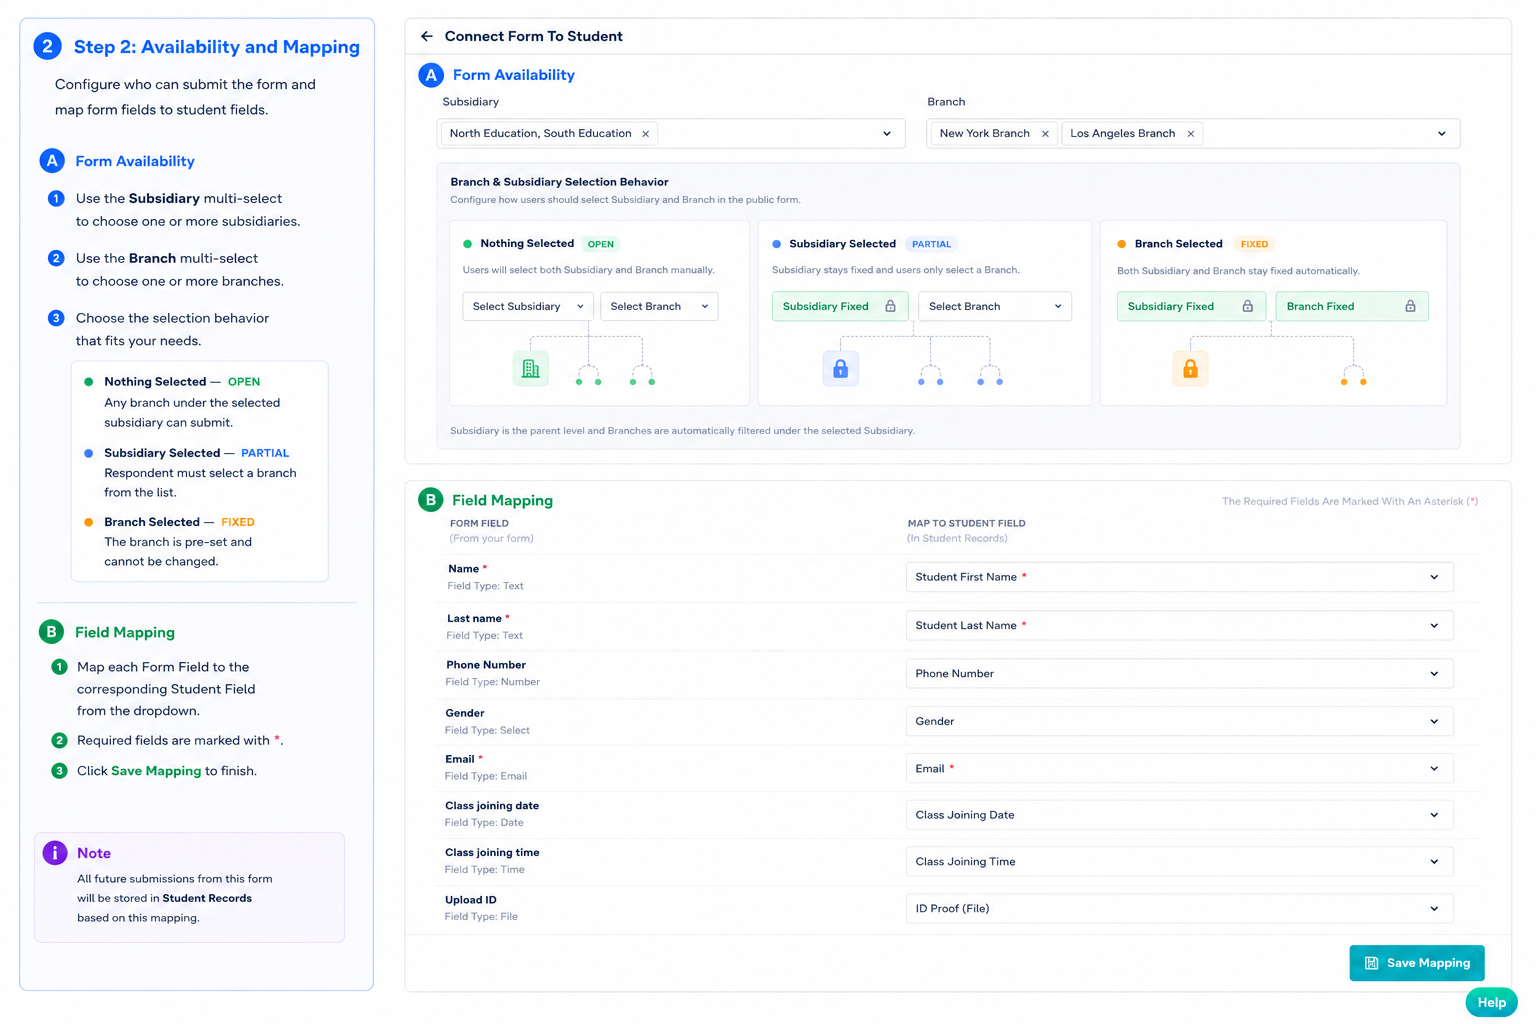
Step 2: Availability and Mapping
- Configure Form Availability and Branch & Subsidiary Selection Behavior (same rules as Leads)
- Map form fields to MAP TO STUDENT FIELD
- Click Save Mapping
Step 3: After Connection
- Use Edit Form Connection or Disconnect Form as needed
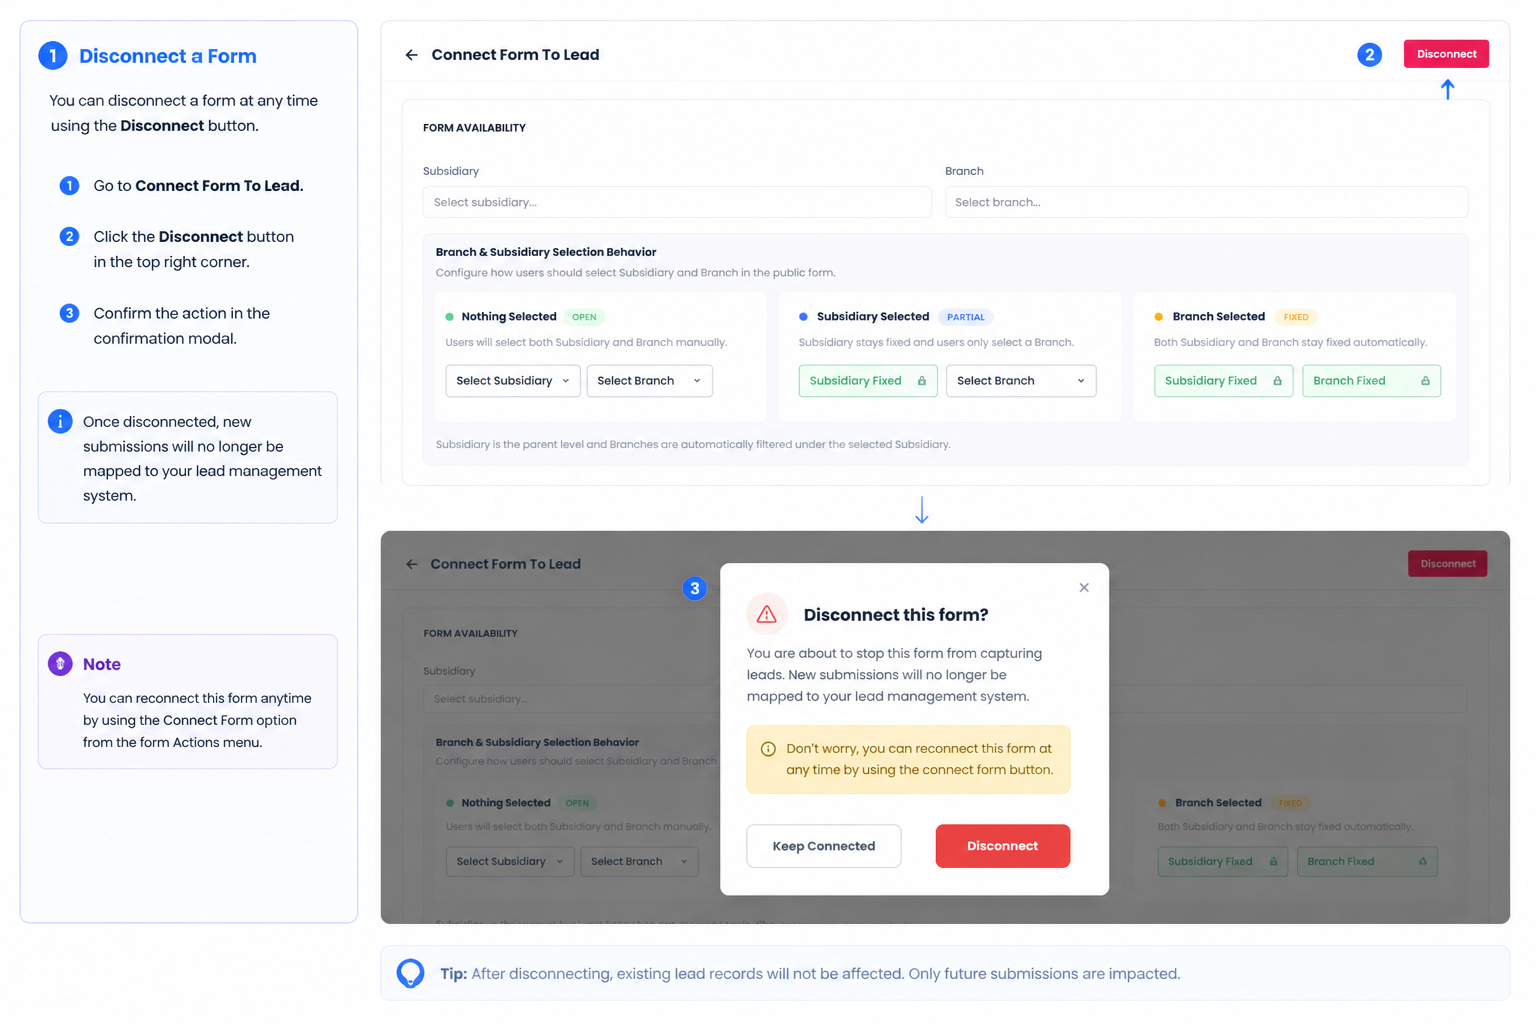
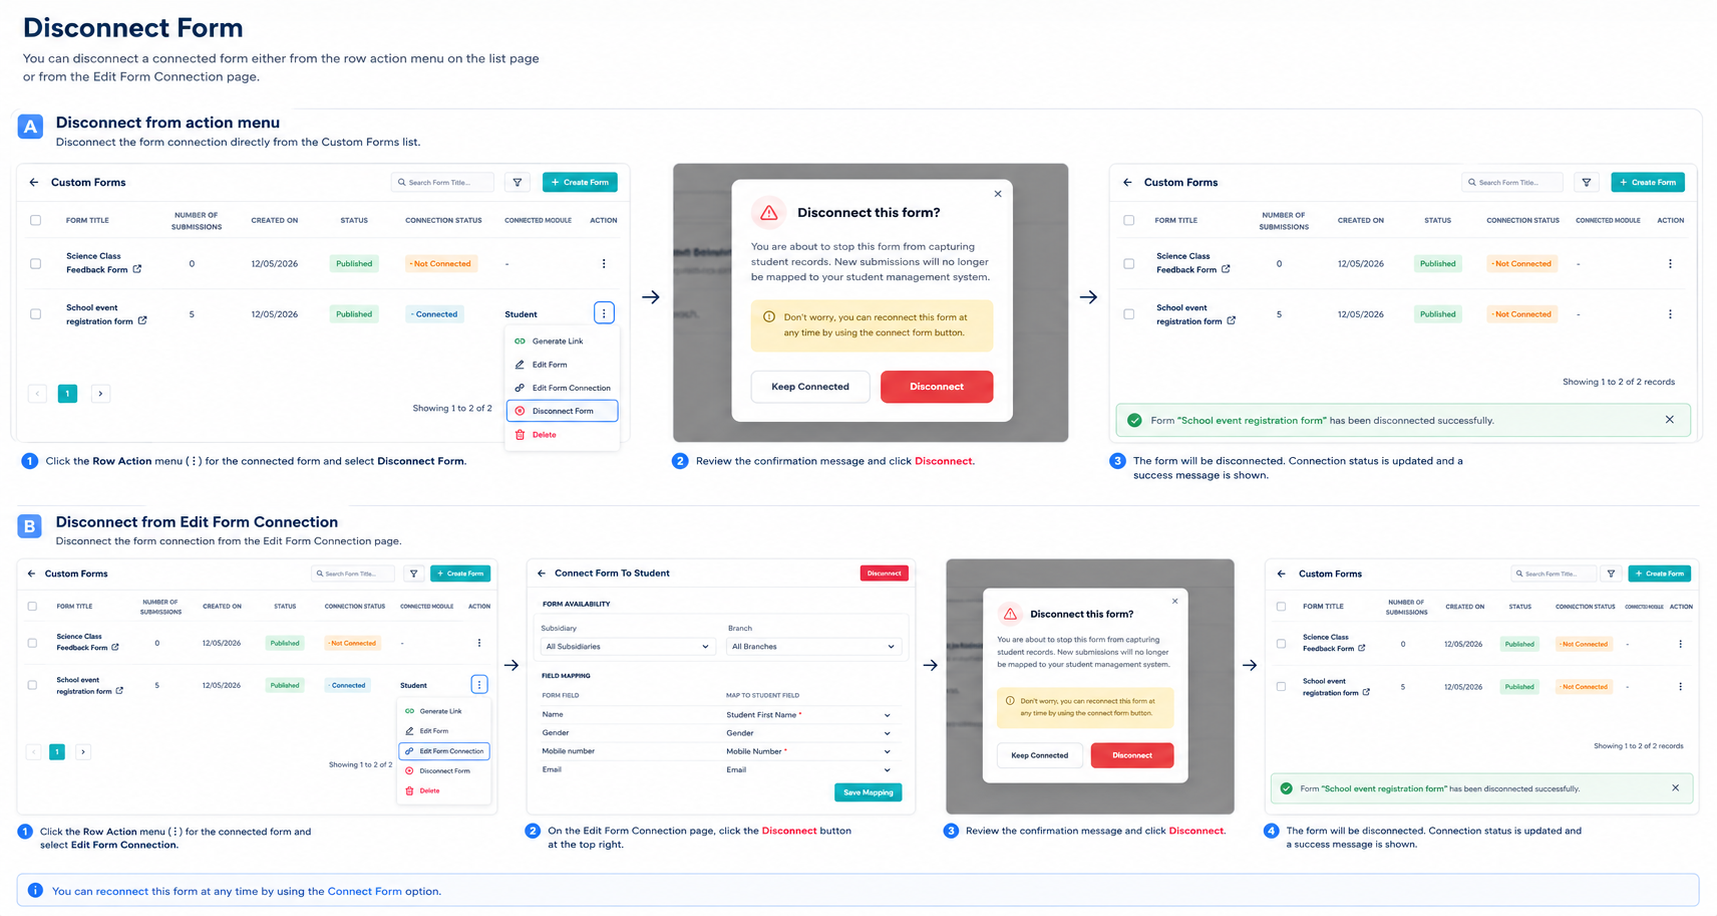
Disconnect a Form
Step 1: From the List
- Row Action (⋮) → Disconnect Form
- Dialog explains new submissions will no longer map to CRM
- Choose Keep Connected or Disconnect
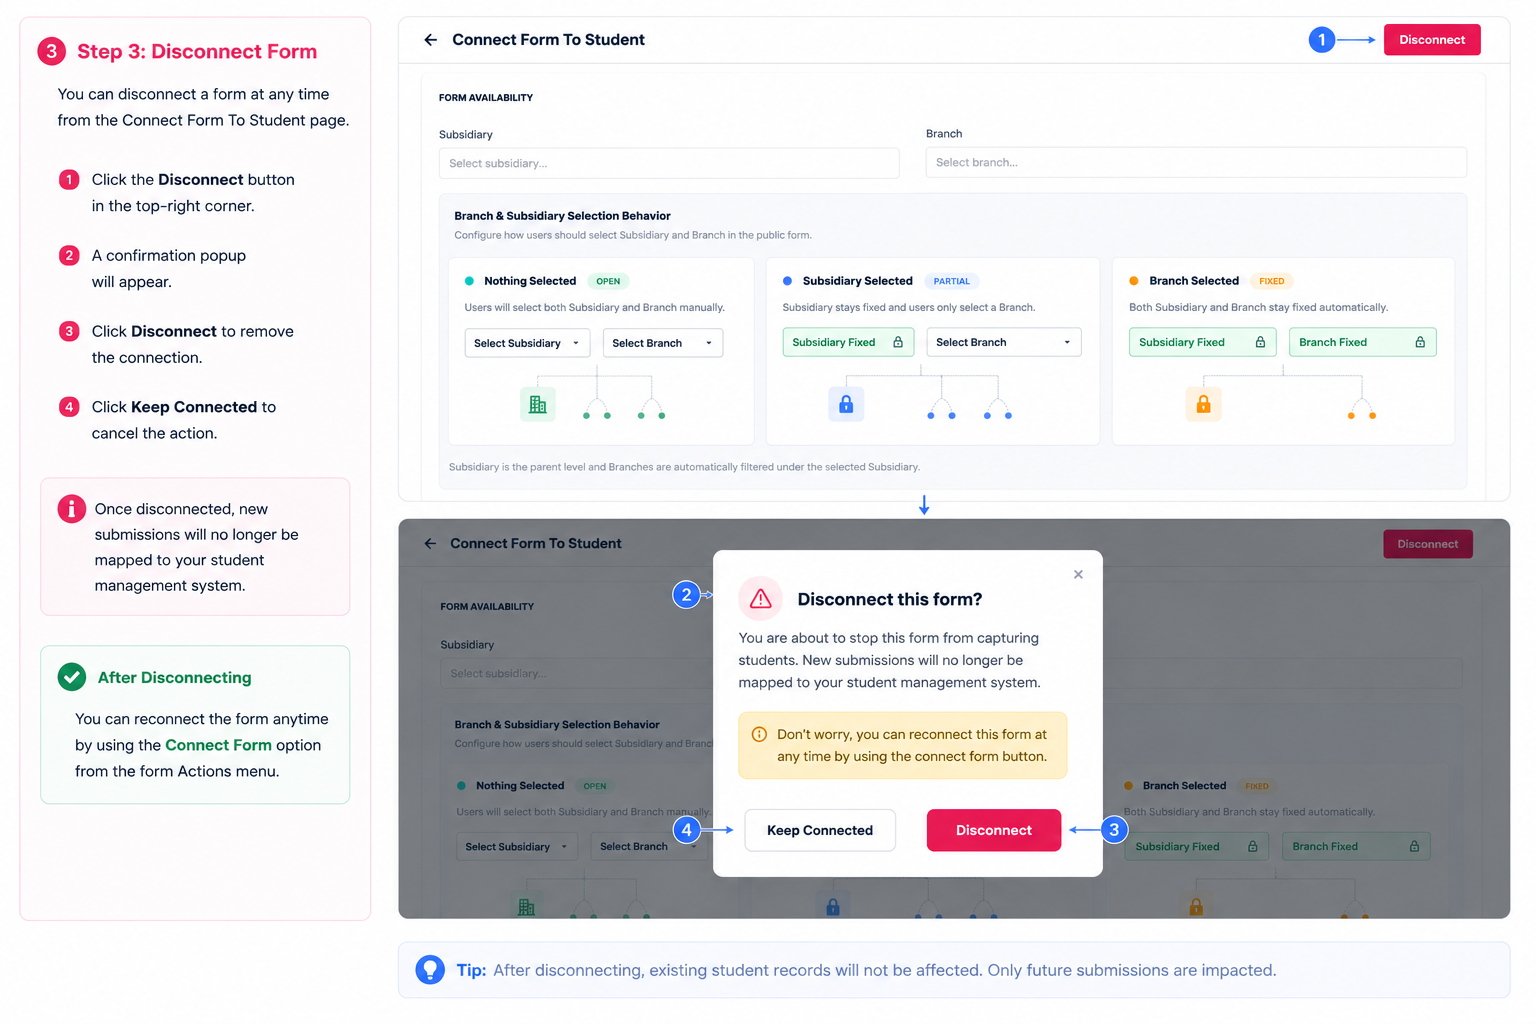
Step 2: From the Connection Screen
- On the Connect Form page, click Disconnect in the header
- Confirm disconnect
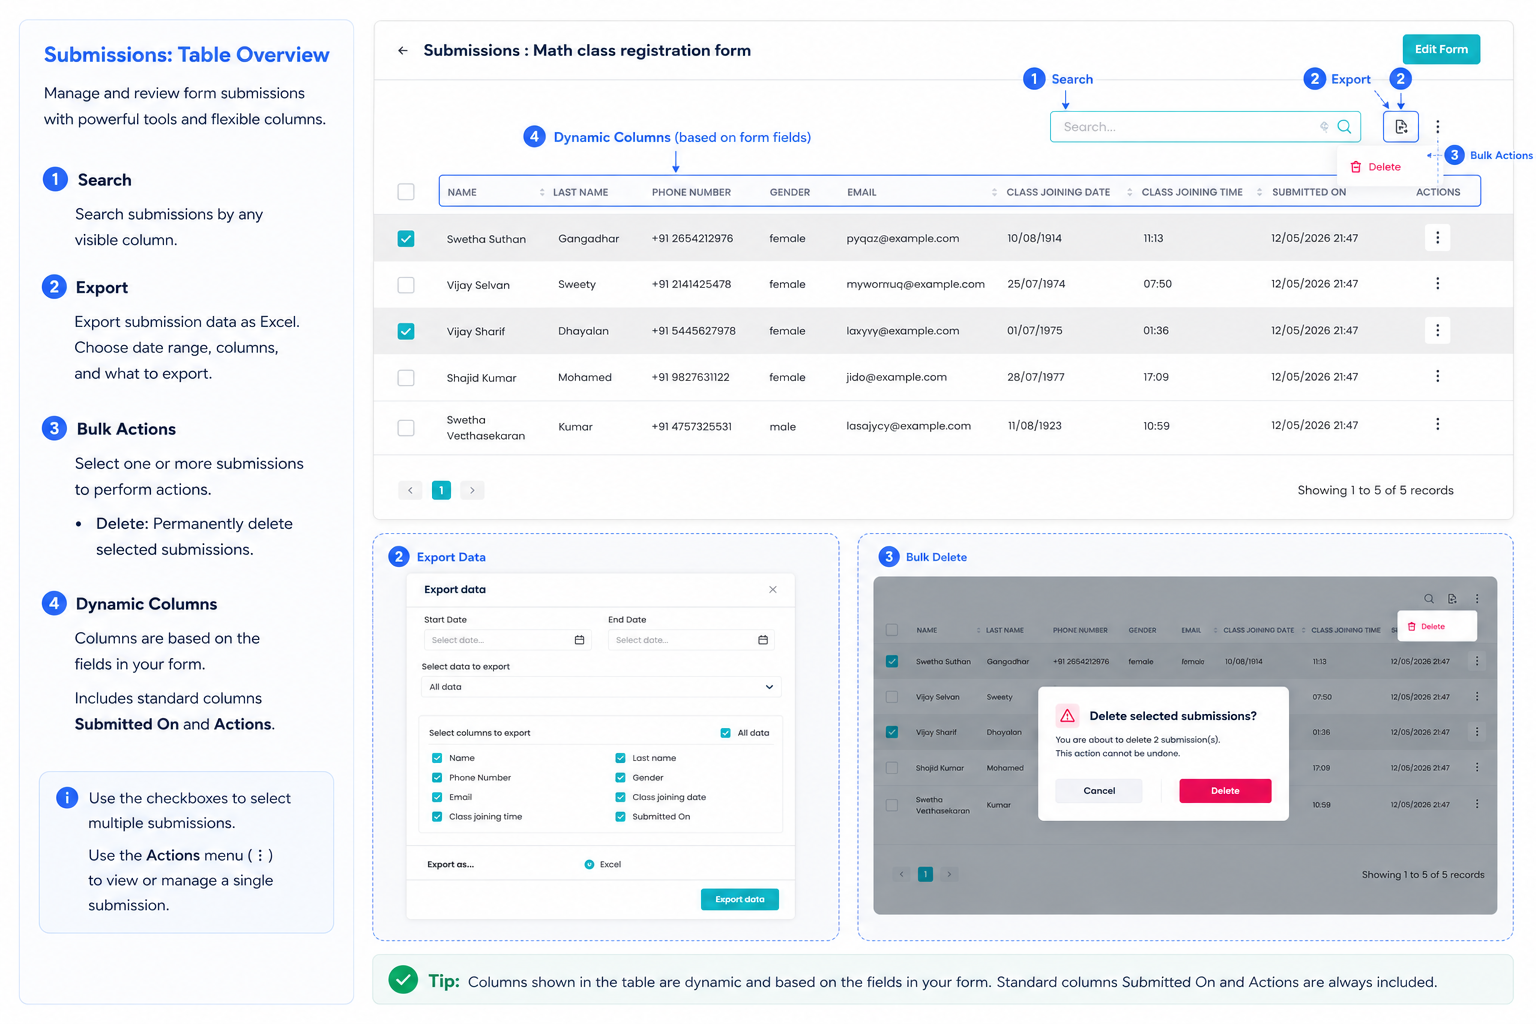
View and Manage Submissions
Step 1: Submissions List
- Click Form Title (or the row) → Submissions: {form title}
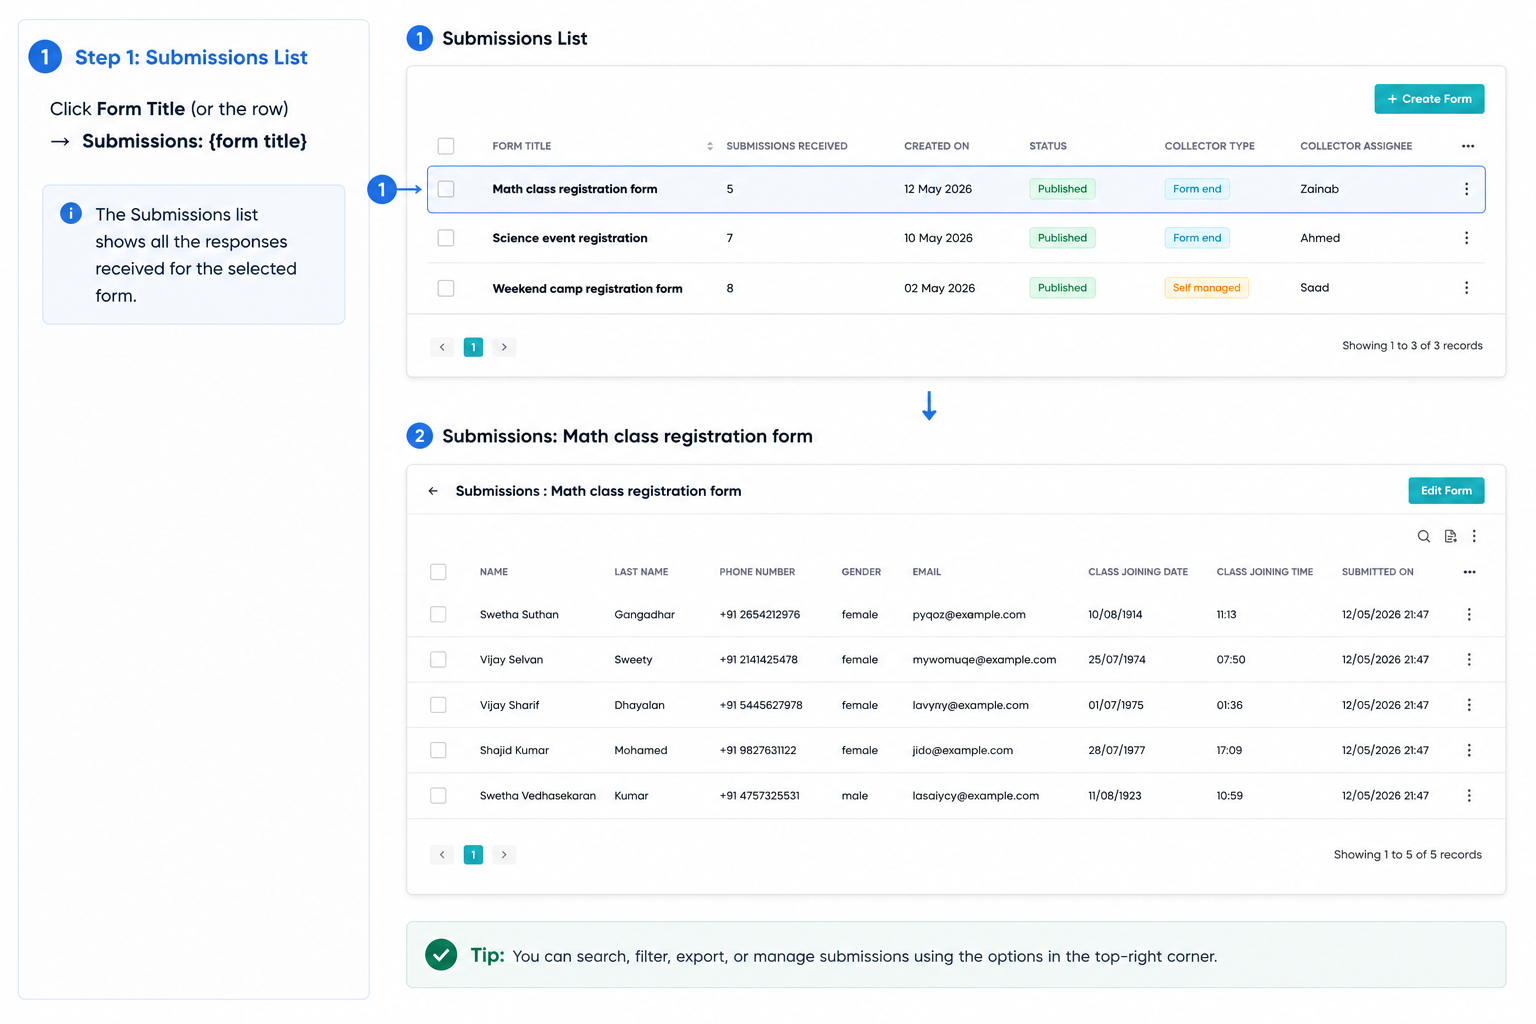
- Toolbar: Search, Export, bulk Actions → Delete, Edit Form
- Dynamic columns per form field, plus Submitted On and Actions
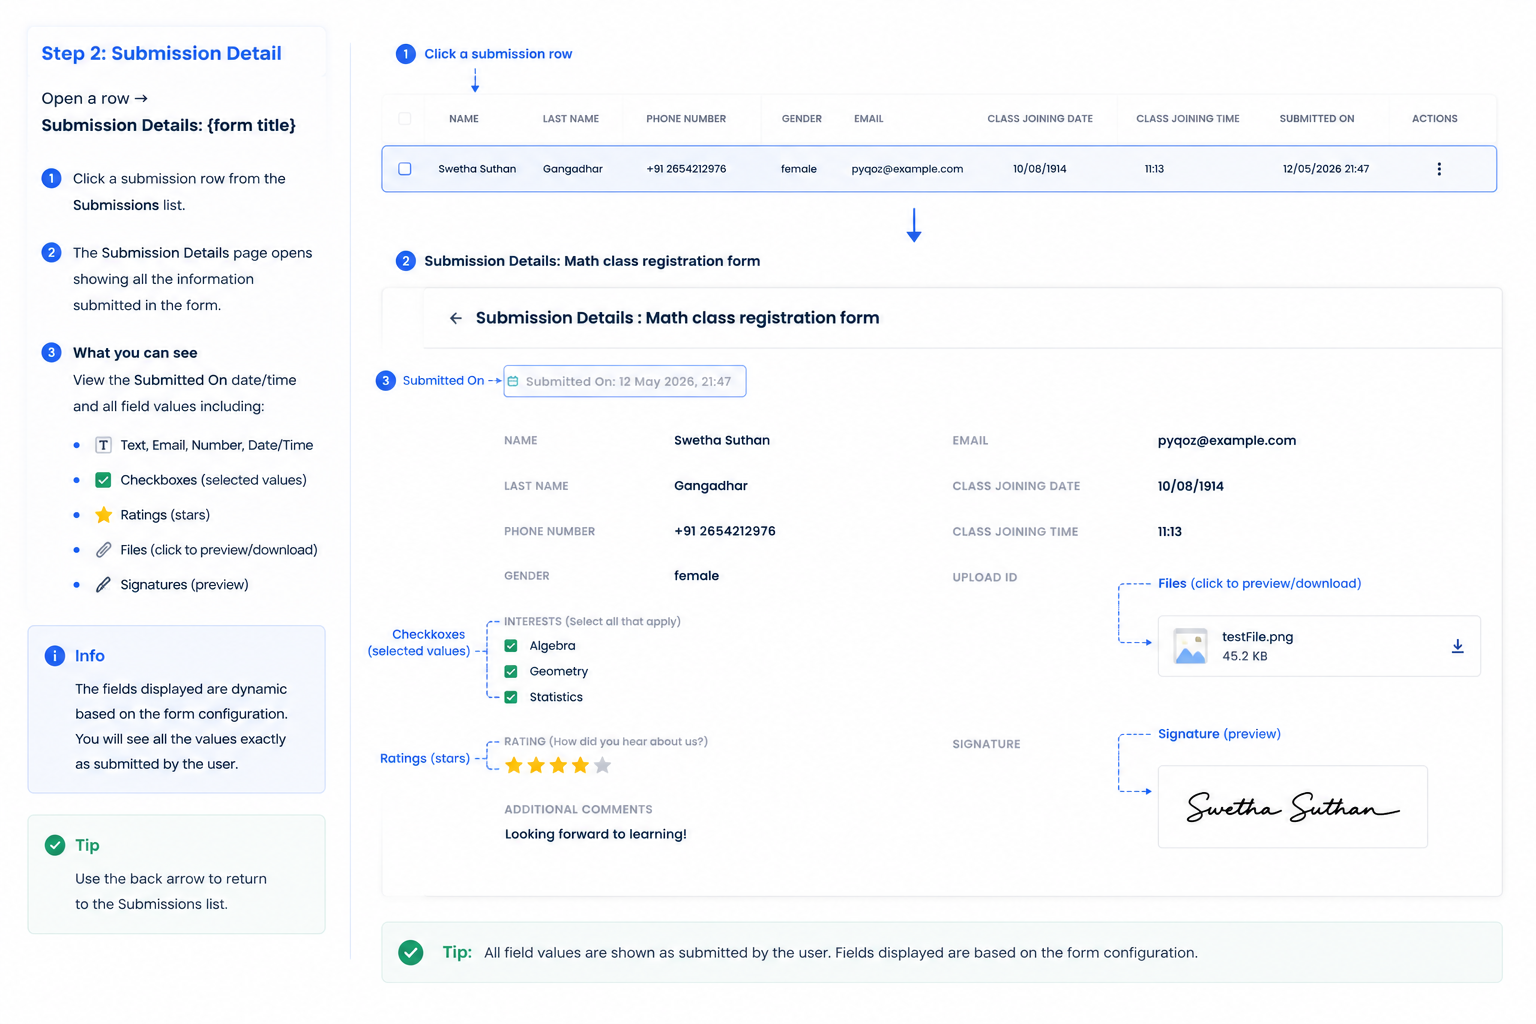
Step 2: Submission Detail
- Open a row → Submission Details: {form title}
- Shows Submitted On date/time and all field values (checkboxes, ratings, files, signatures)
Step 3: Export
- On Submissions, click Export → Custom Form Responses List export flow
Step 4: Delete Responses
- Row Actions or bulk Delete; confirm: Are you sure you want to delete this Response?
View Sample Forms
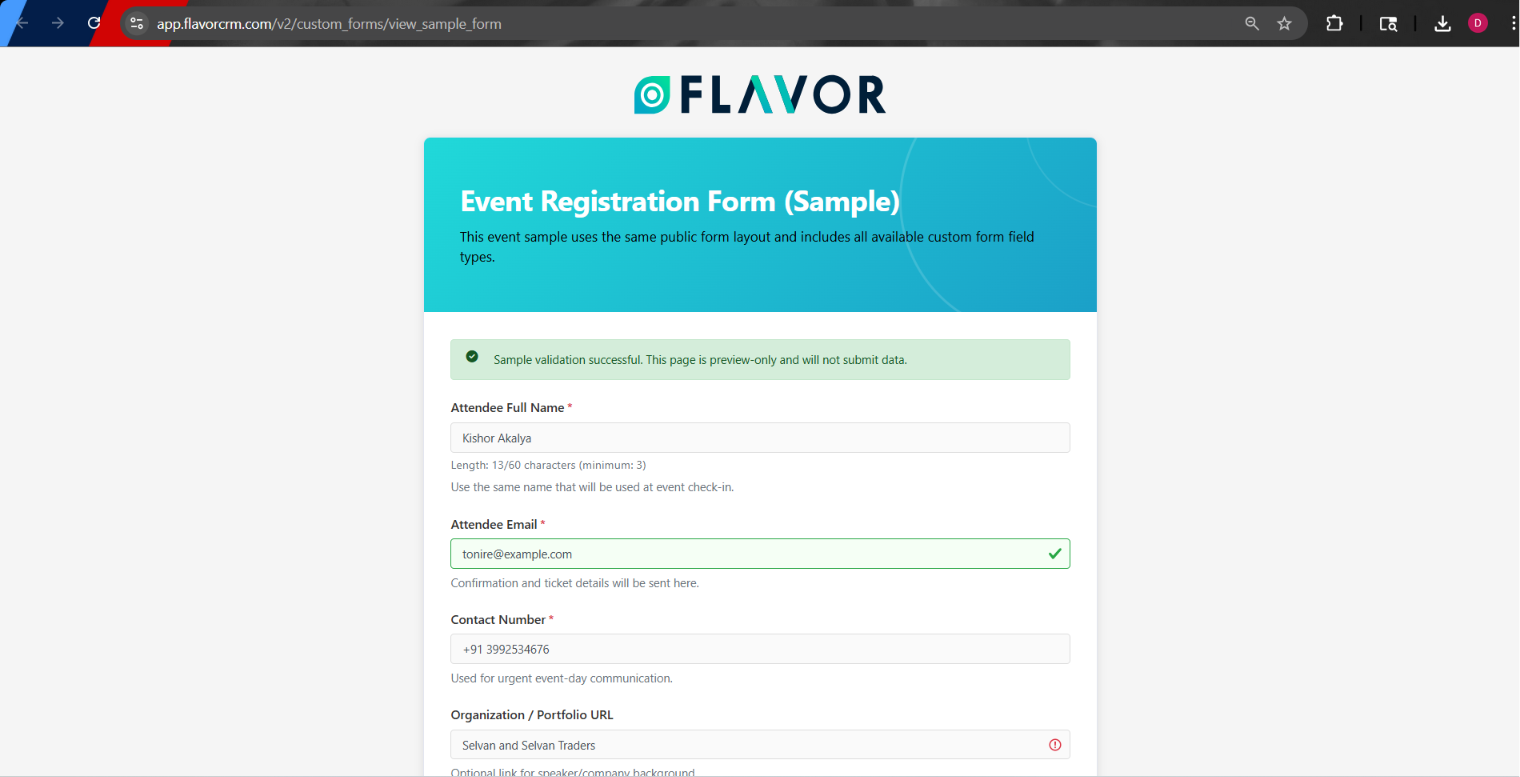
Step 1: Open the Sample Form
- On Custom Forms, in the same banner as View User Guide, click View Sample Forms.
- A new tab opens with Event Registration Form (Sample).
- The page uses the same layout as a live public form and shows the available field types.

Step 2: Review the Sample Fields
- Scroll through the form to see text, dropdown, date, file upload, signature, rating, and other field types.
- Read labels, placeholders, and help text to plan your own form.
Step 3: Try Validation (Optional)
- Click Submit Response with required fields empty to see validation messages.
- Fill required fields, then click Submit Response again.
- A success message appears: Sample validation successful. This page is preview-only and will not submit data.
Step 4: Clear or Close
- Click Clear to reset the form.
- Close the tab to return to Custom Forms.
View User Guide
Step 1: Open the User Guide
- On Custom Forms, find the overview banner under the page title.
- Click View User Guide.
- The Custom Forms article opens in a new browser tab on the Flavor site.
FAQs
Q1. When can respondents use my link?
Only Published forms. Draft and Archive links show the expired page.
Q2. Can I delete a form that has submissions?
No. Remove responses first, or keep the form for records.
Q3. Can I archive a form with responses?
You cannot newly set Archived when responses exist unless the form was already archived.
Q4. What happens when a form is connected to Leads or Students?
Submissions can create or update CRM records per Field Mapping and branch rules.
Q5. How do I stop CRM mapping?
Disconnect Form from the list or connection screen.
Q6. Where do I export responses?
Submissions → Export (Custom Form Responses List).
Q7. Is Custom Forms the same as Registration Forms in Settings?
No. Registration Forms is separate; this module is Custom Forms via Open Forms.
Need more help? Ask us a question
Please let us know more of your details and our team will reach out to you very shortly.